
Your Cart is Empty
Please be sure to watch the instructional videos first. If you still have problems, the following troubleshooting tips may help.
2. Snaps Stopped Closing After Wash/Dry
3. Snaps Falling Off Fabric
4. Snaps are Cracking or Getting Crushed
Snaps can crack if you apply way too much pressure, particularly if you are using pliers or no-change dies. Specialty snaps like engraved and shapes can also crack more easily with too much pressure, regardless of the tool. Try decreasing the pressure a bit.
Snaps can also get crushed when the cap does not sit properly within the cap (bottom) die. First, check that you are using the correct cap die. When placing the cap on the bottom die, the cap should sit completely inside the inner cup of the die. Cracking can happen if any part of the cap is resting on the raised outer edge of the die.
If using pliers, also make sure the correct top metal shank is installed for your snap size.
Refer back to the instructional videos to ensure you are using the correct die and setting the cap on the die properly.
5. Snaps are Uneven
If you are using basic K1/K2 pliers, a slightly uneven press is normal but should not affect the functionality of the snap. Tightening all 3 metal screws may help. These screws should be checked and tightened periodically.
When installing a snap, hold the pliers so that the bottom rests on a table. Then press the top handle down. Like this. This helps to eliminate side-to-side motion and better ensures a flat press (not to mention it's easier on your hands and wrist).
If your flattened prongs are severely uneven, try "resetting" the pliers by taking apart the bottom black cap die tray and the top metal shank and then putting the pieces back together. See how to dissemble the pliers.
If you are installing size 20 snaps, K1 model pliers will tend to have a more uneven press compared to the K2 model (which is why we recommend the K2 for size 20 snaps). You can look up your tool model here.
6. Snaps are Hard to Open
7. Fabric is Tearing
Fabric will tear if it is delicate, thin, or stretchy, like jersey. To prevent ripping, reinforce your fabric with a sturdier material, such as twill, grosgrain ribbon, PUL, fleece, denim, etc around the snaps.
If you are using size 20 plastic snaps on such material, try size 16 plastic snaps instead, which have a slightly gentler grip. Reinforcement will still be necessary.
8. Squeezing Pliers Hurts Hand
A mounting base for your basic K1 / K2 pliers can help to reduce hand and wrist strain. Or simply hold the pliers so that the bottom rests on a table. Then press the top handle down. Like this. This also helps to eliminate side-to-side motion and better ensures a flat press.
9. Tool No Longer Applies Enough Pressure
If you've been using your pliers or table press for a while with good results, then one day they just don't seem to work as well or your newly installed snaps won't close, it may be time to replace some of the parts. Just like any mechanical tool, parts may wear out over time.
Basic K1/K2 Pliers: The tension spring, rubber head, and cap die will wear down the most with continued use. If any of the metal screws are significantly loose, those should be replaced as well. Parts are available for K1 or K2 pliers.
Table Press: Any rubber or springs on the dies will lose their elasticity with continued use, so dies will need to be replaced periodically. Dies are available here. (Before replacing dies for the table press, check if tip #10 below helps first.)
10. Table Press Dies Don't Bulge Out
If you're using a table press with the 3-piece professional-grade dies to install plastic snaps and you've watched the video tutorial, you know that the top rubber dies should bulge out to ensure an adequate press, like this: 
If you can't exert enough pressure for the dies to bulge out, here are some tips:
A) Make sure the vertical screw behind the handle is low enough so it's not getting in the way when you press down on the handle. See image below. If your handle hits the screw, then the screw is too high and needs to be adjusted lower, or even removed. (The screw is to prevent too much pressure from being applied, but for most users, this isn't an issue.)
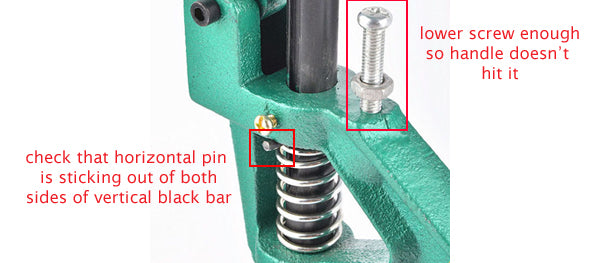
B) Check the horizontal pin that sits above the spring coils to make sure it is inserted completely through the vertical black bar. See image above. The pin should stick out on both sides of the black bar. This pin may shift out with repeated use so should be checked periodically and adjusted if necessary.
C) Place the press on a lower surface, or stand on a stool, so that the press is low enough for your elbow to fully straighten out when you press down. This allows you to lean into the press and use your body weight to apply pressure. You may be able to move the press to a higher surface once you become more familiar with it or as the rubber in the dies become less stiff with use.
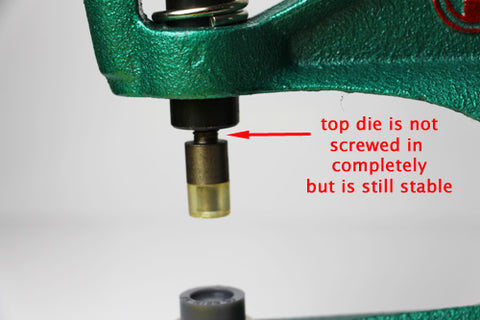
D) Unscrew the top die enough so that it sits lower in the press but is still stable. This will provide a deeper reach and result in a firmer press. (Your top die may look different than the one in the picture.)
E) If the handle is misaligned in your table press, it won't press down adequately and you may have problems with your snaps. This is a rare problem, but here's how to check:
- Press down on the handle slowly. If it shifts to either side on its way down, then it's misaligned.
- To fix misalignment, lightly tap on the black horizontal screw that holds the handle in place. Keep tapping until the handle no longer shifts to the side when pressed down.