
Your Cart is Empty
Panty Liner & Regular/Post Partum Versions
Tutorial below copied with permission by Take Time to Smell the Rose
A sample pattern is provided here .
You will need a cotton print for the 'wrapper' part of the liner, a cotton inner (I used an old t-shirt), a cotton topper (I used scrap thin white broadcloth) and of course your pattern.

Cut 2 of the print wrapper, 1 of the cotton inner and 1 of the cotton topper.

Pin right sides together of the print wrapper and then the inner and outer layers.

Sew both sets together while leaving an opening to turn right side out. Press.

Tuck in raw edges of the opening on the print wrapper and then top stitch around the wrapper. Pin on the topper in position. Make sure to tuck in the raw edges of the opening.

Top stitch the topper onto the wrapper. If you follow my pattern it will look a little different from my first panty liner below. I cut the topper slightly smaller so it is not so close to the edge of the wrapper.

Backside view after everything has been top stitched.

Next you need to add some snaps (size 20 shown in photo). I have a pair of KAMsnaps pliers which make it easy, but you can also use sew on snaps that you can purchase at any craft store. I found that one set of snaps keeps the panty liner in place well. I will be using 2 snaps on my post partum pads because they are longer.


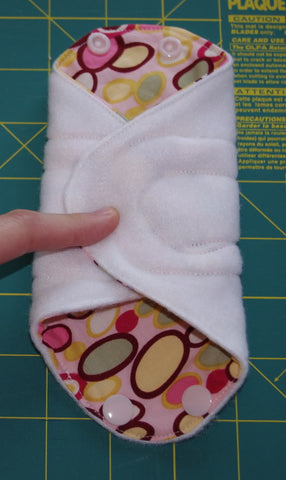
This is what the panty liner looks like when it's snapped.


Then you can tuck in the sides for easy travel in your purse. (sorry the picture is so blurry!) You can follow my tutorial on how to make a wetbag to keep dirties in until you wash or to make a 'travel bag' to keep in your purse (you'll just want to make a small one!).
A sample pattern is provided here .
These pads are thin enough to use for regular period flow but are also sufficient for post partum.
Materials:
Non-pill fleece: This is the backing of the pad. The fleece acts as a waterproof barrier and helps it stay in place and not shift.
Cotton Print: You can use anything you like. I used all scraps I had on hand.
Aborbent Material(microfiber, hemp, bamboo, cotton, Zorb, etc).
Minky: The great thing about Minky is that it does NOT stain. I went with white because it would go with any cotton print. I only had a couple of pads that stained just the slightest bit, but came out with sunning. They have been used several times during my post partum period and look very clean.
Snaps: I used KAMsnaps (size 20 shown in photo).
Suggestion: cut out just 1 pad and try it on and see if you need any adjustments to it in length or width. Once the pad is to your liking use the patterns and a fabric pen to trace out as many pads as you need. Then you can cut all the material out at once and then sew them all. It goes much faster this way.
Cut out the 4 layers you need for 1 pad

Pin right sides together of both bottom layers and top layers

Sew layers together with a 1/4 inch seam allowance, leaving a small gap open. Turn right side out.
Top stitch the bottom layer, closing up the unsewn gap as you are top stitching.

Pin the top layer on the bottom layer.

Top stitch the top layer. Then sew once again about 1/2 inch inside the topper.


Attach snaps to desired fit.


Can be folded down into a square after use.

Using Mama Cloth:
Just like cloth diapers, store used cloths in a dry wet bag until ready to wash. I do a cold rinse then a hot wash with detergent. I also use a little bleach. Then one extra cold rinse. Dry in dryer (doesn't take long!)
Alternative Tutorials:
Mabe, with Love also has a set of tutorials for each type of cloth pad shown below.
