
Your Cart is Empty
Download a printable reference guide. Instructions are only briefly summarized in the guide so we highly recommend watching our easy-to-follow video tutorials below for each die set before use.

Before Use:
Maintenance:
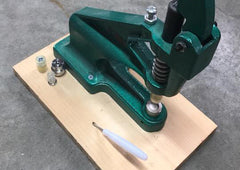
Press is mounted to a block of wood for stability
without compromising portability.
Holes have also been drilled in the wood for easy
storage of the dies and awl. (Photo by Nicole C.)